10. The Open Group Standard Template
In this chapter we give a brief overview of how to instantiate a project using The Open Group Standard template. This is primarily for advanced users, usually the maintainer of the project. We describe the steps below in their most generic form.
10.1. Getting Started
When developing a new document we create the project by importing a copy of the template.
10.1.1. Step 1: Create the New Project
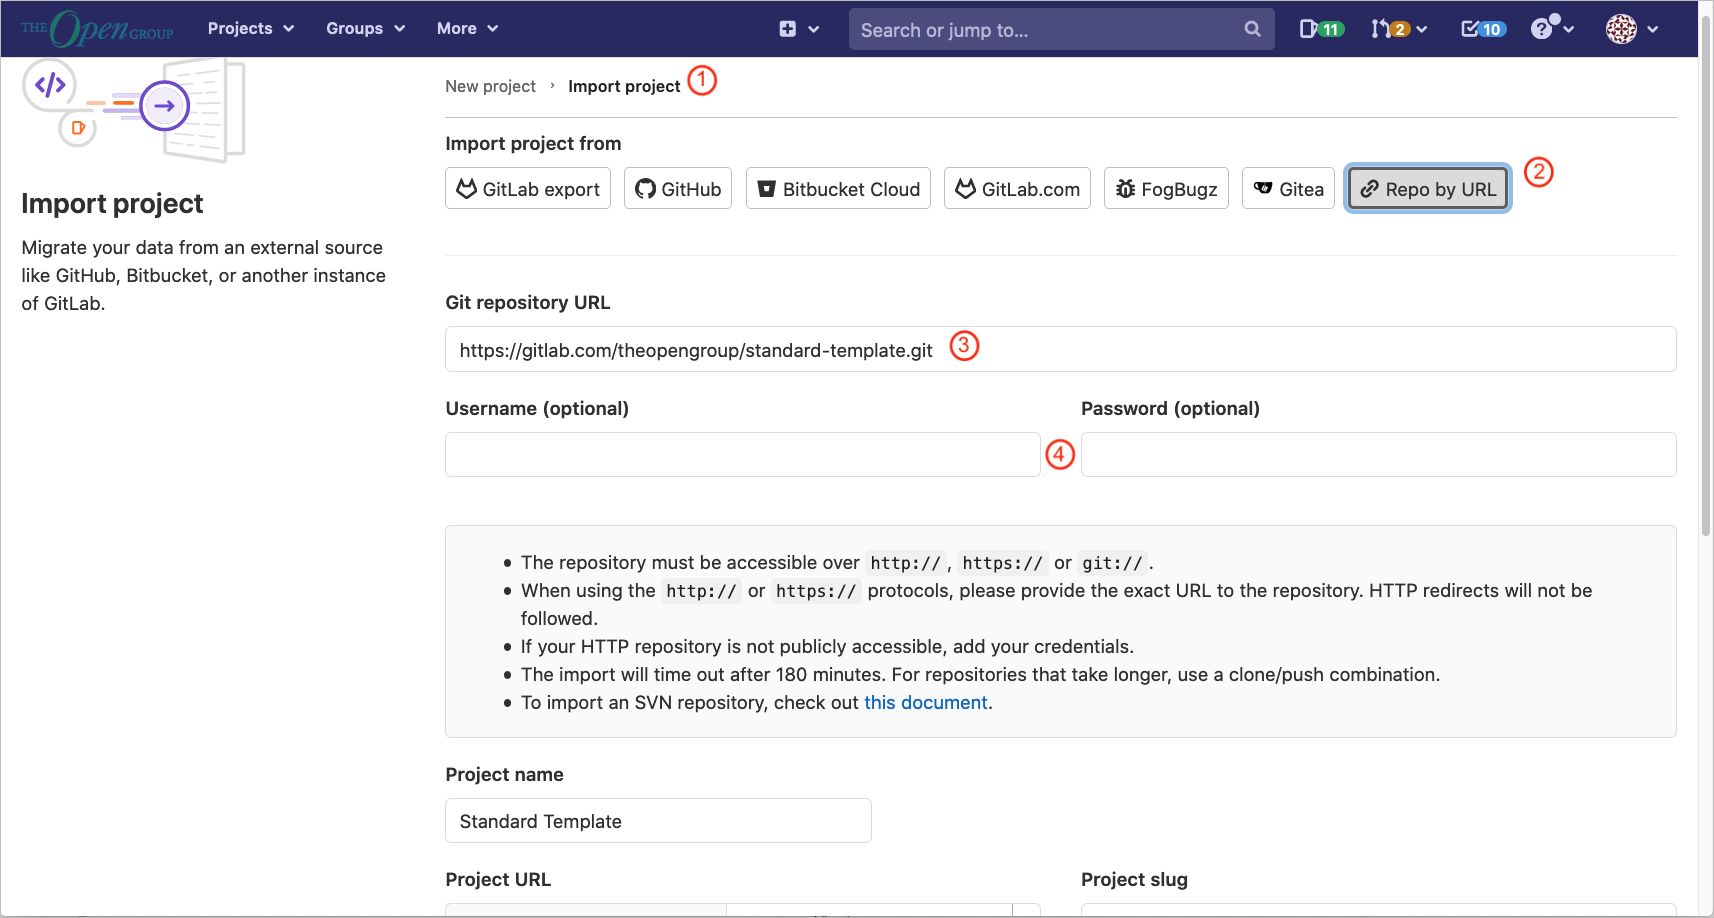
Go to top level of the GitLab site, and select New Project. See Figure 64.
| 1 | Select the "Import Project" tab |
| 2 | Click on "git Repo by URL" |
| 3 | Enter https://gitlab.com/theopengroup/standard-template.git into the Git repository URL field |
| 4 | Leave Username and Password blank |
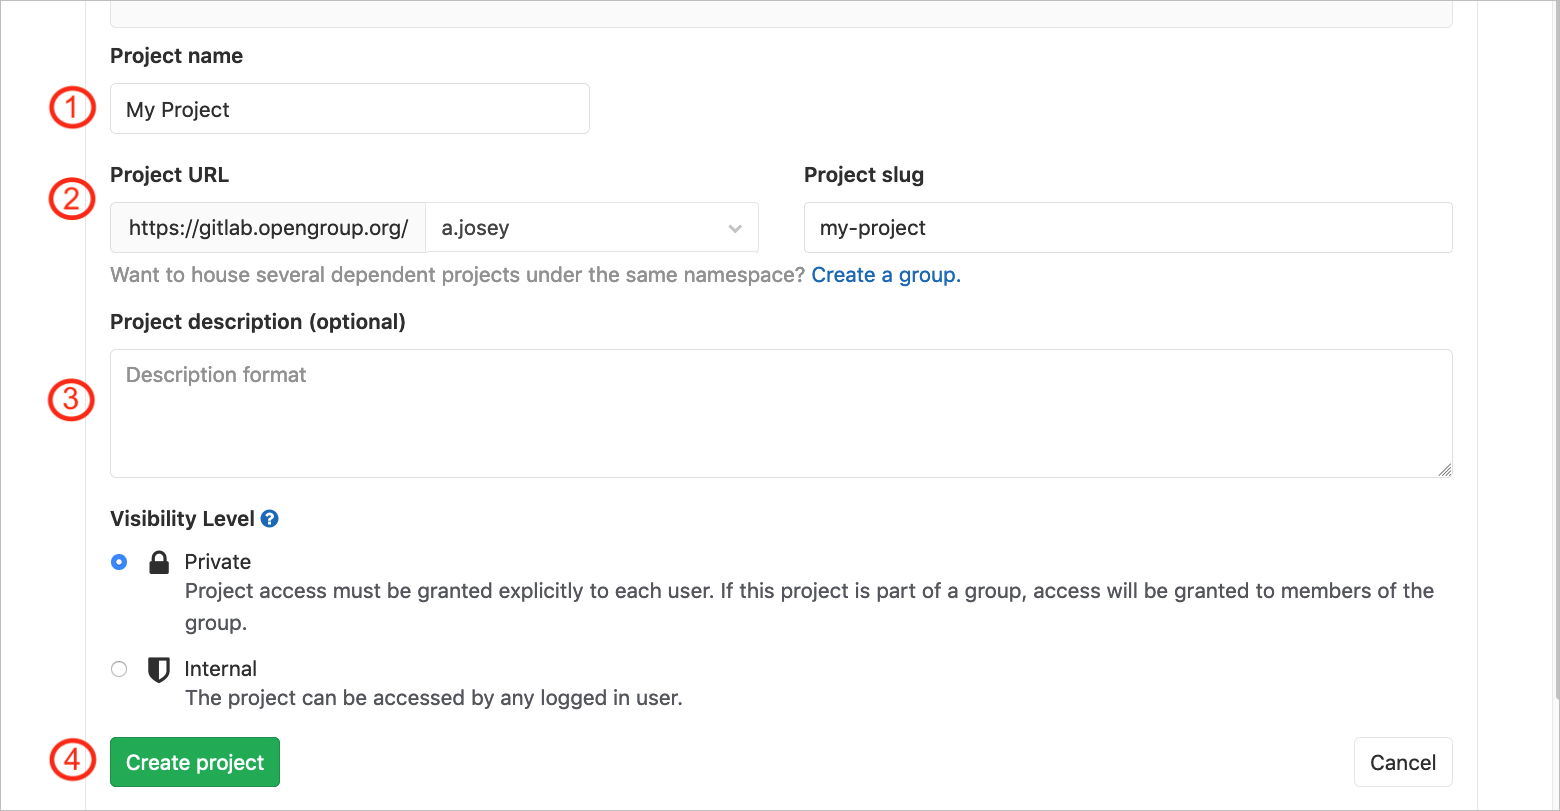
See Figure 65.
| 1 | In Project Name, change from "Standard Template" to your project name, in the example shown "My Project" |
| 2 | Optionally adjust the Project URL and Project slug |
| 3 | Enter Project Description, and also Visibility Level |
| 4 | Finally select Create Project |
10.1.2. Step 2: Configure the Document
See Section 10.3.
10.1.3. Step 3: Commit the Changes
The final step is to commit the configured document back to the project repository.
We recommend using the Brackets editor to do this. See Section 7.4 to commit the project.
10.2. The File Tree
In general, files beginning with underscore (_) are configuration files. They may need to be tailored for the document.
Files with suffix .sh are shell scripts.
Files with suffix .rb are Ruby scripts.
Files with suffix .adoc are AsciiDoc files.
The file tree should look as follows (directories are shown with a trailing slash (/)):
LICENSE
README.md
_book-html.adoc
_book-pdf.adoc
_files.adoc
_strings.adoc
_vars.sh
bin/
ci/
images/
modules/
output/
references.bib
resources/
The source for the document is developed in the modules directory.
The built documents are placed in the output directory.
10.3. Configuring the Document
10.3.1. Project Strings
The key file to set up a document is _strings.adoc. This sets various strings for the project.
// String Variables file
//
// Common strings should appear here for the Project
// To define a string variable:
//     :varname: value
//
// Use // to start a comment
//
// Used in many places including the copyright
//
:tog-producer: The Open Group
//
// Copyright type - default or short
:tog-copyright: default
//
// Copyright year - 2023, or 2005-2023
:tog-copyright-year: 2024
//
// The document type - Standard, Snapshot, or Guide
//:tog-doctype: Snapshot
//:tog-doctype: Guide
//:tog-doctype: TOGAF Series Guide
:tog-doctype: Standard
//
// for documents produced by the OSDU Forum set to true
// Sets the logos for the cover for pdf output
//:tog-osdu: true
:tog-osdu: false
//
// Is this a draft, if so DRAFT, if not leave blank
:tog-draft: DRAFT
//
// The Document Title
// use {nbsp} if you do not want it to break across lines
:tog-doctitle: The Book Title{nbsp}Here(TM)
// Inside Title - above without trademarks, can be an abbreviation
:tog-doctitle2: The Book Title{nbsp}Here
//
// Select a date format for page footers
// date format differs between published Standard (year) and Snapshot (date/time)
// {docyear} is year only
//:tog-date: {docyear}
// {localdatetime} is the date and time of the build
//:tog-date: {tog-draft} {localdatetime}
:tog-date: {tog-draft} {localdatetime}
//final Build
//:tog-date: {localdate}
//
// Keywords for the Document
//
:tog-keywords: Standard, Template, The Open Group, www.opengroup.org
//
//
// Document Number; e.g., C231, G236
// Document numbers are assigned by the editorial team.
:tog-document-Number: C23x
//
// ISBN number  (assigned by the editorial team)
// if set, edit frontmatter/copyright.adoc and uncomment a line
//:tog-isbn-number: 1-947754-xx-x
//
// Where to send feedback email to
:tog-feedback-email: ogspecs@opengroup.org
:tog-snapshot-feedback-email: ogspecs-snapshot-feedback@opengroup.org
//
//
// Whether to make template guidance visible in the document output;
// true is on, false is off
:tog-guidance: true
//:tog-guidance: false
10.4. Setting the Output Filename
The default name for the output files is Template, which is set in the TOG_DOCNAME/DOCNAME variable. If you are not sure of the naming then check with The Open Group editorial team.
There are two files to edit to change the name:
-
_vars.sh
-
.gitlab-ci.yml (see Section 10.4.2)
10.4.1. _vars.sh
The document name should be set in _vars.sh.
# Variables for the build scripts in shell script format
TOG_DOCNAME=g_Handbook-for-GitLab-Development
export TOG_DOCNAME
10.4.2. Configuring the Automated Build
The automated build is driven off the .gitlab-ci.yml file.
This will build a tree of output in the project repository. By default the output is to build the PDF and HTML output.
You should set the value of DOCNAME in this file.
image: opengroup/og-asciidoc-build-tools

variables:
  DOCNAME: g_Handbook-for-GitLab-Development

include:
#  - local: '/ci/compliance-checker.yml'
#  - local: '/ci/compliance-notify.yml'
  - local: '/ci/build-and-deploy.yml'

stages:
#  - compliance-check
#  - compliance-notify
  - build
  - deploy
10.4.3. Adding Chapters and Files to the Document
The file _files.adoc contains the list of files to build the document.
// The files used to build the document
// Switch auto-numbering off for sections such as the frontmatter and part pages
:sectnums!:
//frontmatter
include::modules/00-front-matter/title-page.adoc[]
include::modules/00-front-matter/copyright.adoc[]
include::modules/00-front-matter/preface.adoc[]
include::modules/00-front-matter/trademarks.adoc[]
include::modules/00-front-matter/acknowledgements.adoc[]
include::modules/00-front-matter/references.adoc[]

// The introduction starts at Chapter 1 in The Open Group Standard template, and must be numbered
// For The Open Group Standards the first two chapters must be Introduction and Definitions
:sectnums:
include::modules/01-doc/pages/chap01.adoc[]
include::modules/01-doc/pages/chap02.adoc[]

// Your original content can start here
include::modules/01-doc/chap03.adoc[]
// A chapter could be built from one or more files;
//e.g., to add a file
//include::modules/01-doc/pages/chap03-part2.adoc[]

// This is an example part page
:sectnums!:
include::modules/01-doc/pages/part1.adoc[]
:sectnums:
include::modules/01-doc/pages/chap04.adoc[]

// The appendices follow
:sectnums!:
include::modules/99-appendices/pages/section-intro.adoc[]

:sectnums:
include::modules/99-appendices/pages/appendix.adoc[]
include::modules/99-appendices/pages/rationale.adoc[]
// Index is not generated for html
ifdef::backend-pdf[]
// The index is auto-generated
include::modules/99-appendices/pages/index.adoc[]
endif::[]